
1. Prerequisite
Before entering data, please ensure that JavaScript is enabled in your web browser. Otherwise, you will see a warning message. Instructions on how to enable JavaScript can be found in the online warning message.
2. Log In
Access the Early Years Evaluation online data entry site using https://app.earlyyearsevaluation.com.
The EYE Support Team will issue you a personalized username and password once your session is open. (Note: You will not be able to enter data with the generic login used to access resources.) After logging in, you can access the wide variety of features that our online data entry site has to offer. These features include entering scores, editing children’s demographic information, viewing reports, and accessing our resources section.
Select your preferred language from the language selector at the top right corner.
3. General navigation
4. Information on how to use a page
5. Edit your class list
5.1 Select a class to begin
All classes assigned to you will be listed on the landing page.
The progress bar under Progress Overview allows you to see the data entry progress of each class on the landing page.
Click on the Manage Children Data and Enter Scores icon (depicting two children) to proceed to data entry.
5.2 Edit and Confirm Class List
The data found in your class list is provided to us by the EYE-TA coordinator for your jurisdiction. We work together with the coordinator to try to ensure that all information is correct; however, errors can still occur.
PLEASE CHECK YOUR CLASS LIST CAREFULLY!
1. Sort class list
- The names of the children on your class list are displayed by default in this order: last name, first name.
- To change the display order, click on the Sort by First Name or Sort by Last Name button.
2. Edit a child’s information
To edit a child's information, click the pencil icon . Make the necessary changes and click Update. All required fields must be completed.
3. Child is no longer in your list
Put a checkmark in the Moved column to indicate a child has moved out.
4. Child not assessed
Put a checkmark in the Not Assessed column if a child is exempt from the entire assessment. Please indicate a reason in the Note column.
5. Add/Transfer a child to your list
To add a child to your class list, click on the Add/Transfer a Child button. Follow the on-screen instructions to complete the process.
Note: You may add children to your class list before reports generation; however, children added after you have confirmed your class list will be listed in chronological order at the bottom of your pre-confirmed class list. This will ensure that your EYE-TA Teacher Checklist and class list in the data entry site MATCH at all times.
To transfer a child:
- Within the same jurisdiction (e.g., transfer from morning to afternoon class, transfer from one teacher to another, transfer from one school to another) - Click on the Add/ Transfer a Child button and follow the on-screen instructions to transfer a child.
- From another jurisdiction (e.g., transfer from one school district to another) - To ensure confidentiality, child records from outside jurisdictions cannot be readily transferred. In these cases, simply add the child to your class list. The EYE Support Team will then rectify the duplicity of the records by linking them on the back end. To access past results for these children, contact eye-support@thelearningbar.com We will contact the jurisdiction where the child was assessed in the past, and upon obtaining their permission, we will share these results with you.
Important Note:
Make sure that the Student ID (if available) and the Last Name, First Name, and Date of Birth of the child to be transferred are typed correctly. Our system should then be able to retrieve the child's information and ask for confirmation to transfer the child.
6. Confirm class list
Once you have made all the edits to your class, click the Proceed to Score Entry button at the bottom of the page to finalize your class list and begin the evaluation.
6. Print EYE-TA Teacher Checklist
Once your class list has been confirmed, you will be directed to the Progress Overview page, and you can download the Teacher Checklist with the children names printed by clicking the Generate Checklist button.
Note: Please be patient as the checklist is being created as it may take a few minutes to generate.
7. Enter scores
Results can be entered online as you go. Alternatively, you may want to write down the results on your EYE-TA Teacher Checklist first and enter them later.
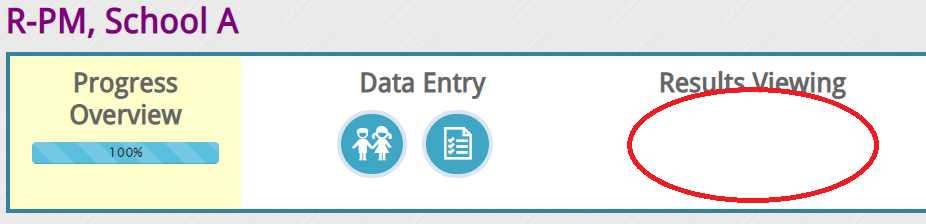
7.1 Progress Overview page
This page allows you to monitor your progress through the administration of the EYE-TA from start to finish. Each domain with its’ colour-coded items are displayed on this page.
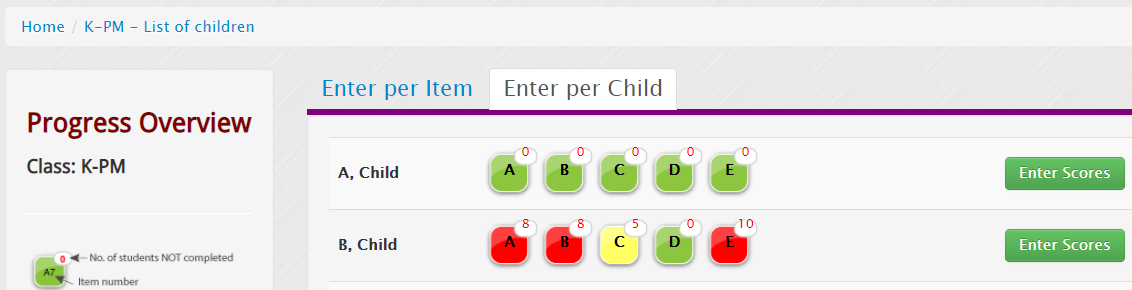
The colour-codes represent whether you need to begin an item (red), have begun an item (yellow), or have completed an item (green) within each domain. The number in the top right corner of each colour-coded item displays the number of children who have not completed this item.
You can hover over each item with your mouse to see a description.
7.2 Entering data
General layout of a score entry page:
There are two ways of entering scores: 'per item' or 'per child'. Most of the time, you will be entering scores 'per item', for instance, if you have observed all the children during an activity. However, if a child joins your class mid-session, entering scores 'per child' would make more sense. Let's look at both options.
7.2.1 Entering data 'per item'
By default, data entry is set to 'Enter per Item', but if you have just entered data 'per child', you will have to select the 'Enter per Item' tab.
Clicking on any one of the colour-coded items allows you to view or enter data for that item. Once you complete the item that you have chosen, you will be directed to the next item.
7.2.2 Entering data 'per child'
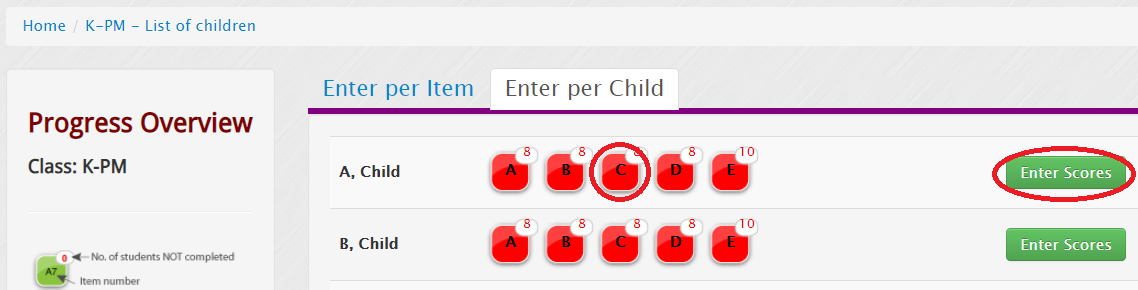
The other way to enter children's scores is 'per child'. This method should help save time if you only need to enter data for a small number of children (e.g., if a new child moves into the class after you've entered data for all the others). This new data entry method has been integrated into the Progress Overview page, so you do not need to do anything different to be able to access it. Just confirm your class list as usual and you will see the new option on the Progress Overview page as shown below.
Selecting the Enter per Child tab will take you to a list of all the children in your class. From here, you can click Enter Scores for the child you'd like to input data for or, if you'd like to enter scores for a specific domain, you can click on the domain icon instead.
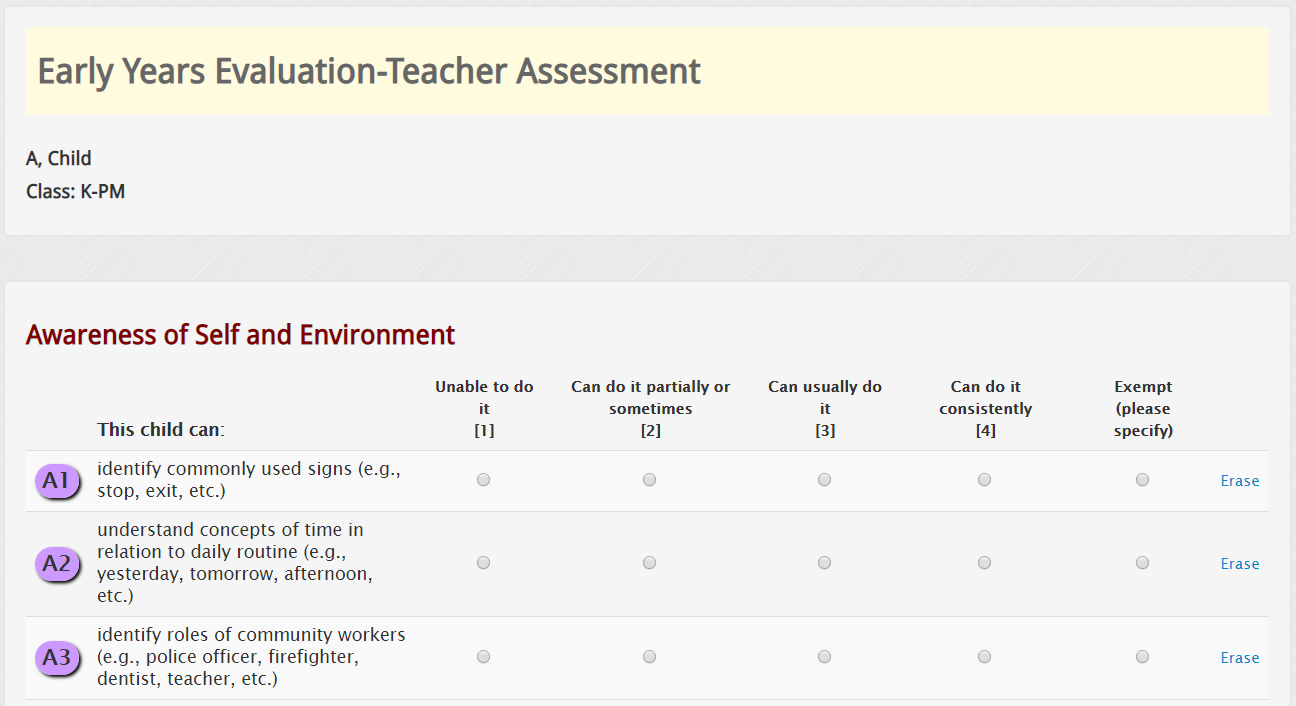
Score entry is still on the exact same four-point scale as always. The only difference in data entry is that all 42 EYE-TA items are listed on the same page, so that you can run through the whole assessment without needing to load 42 separate pages; something that can be frustrating when you only have a single child to enter data for. You can also still use your keyboard's number keys (1-4) to quickly enter scores without having to use a mouse to click each one.
Once you are finished entering scores, make sure to head to the bottom of the page to save your results. You do not have to enter all scores at the same time, but make sure you save the scores you do enter before closing the window.

When you return to enter more data later, the app will let you know which domains still need scores entered.
7.3 Enter scores for a partially complete EYE-TA
Any time you re-enter the data entry site, please click on a class name to begin. Unless you have completed the assessment, you will be directed to the Progress Overview page.
7.4 Print completed Teacher Checklist
An important feature to highlight is the teachers’ ability to print the Teacher Checklist with the names of the children in the class and their individual item scores circled for each child. Printing and viewing this checklist will allow teachers to review their individual item scores prior to generating the final reports.
7.5 Submit final scores and generate reports
After reviewing the scores in your completed Teacher Checklist, if you have no missing scores or no edits to make, click on the Progress Overview/Generate Checklist link in the breadcrumb and you can generate the reports by clicking the Generate Reports button near the bottom of the page.
Note: Once you have generated the reports, you cannot go back and edit any of the scores entered.
7.6 Reopening a classroom to add a child
You may reopen a classroom after you've generated your reports, as long as the data entry window is still open for your jurisdiction. This is a useful feature if a child has joined your class or is back from an extended leave. Please note that this feature does not include the ability to reopen specific child records to change finalized scores. This must still be processed through your jurisdiction's EYE coordinator and is reserved for data entry errors only.
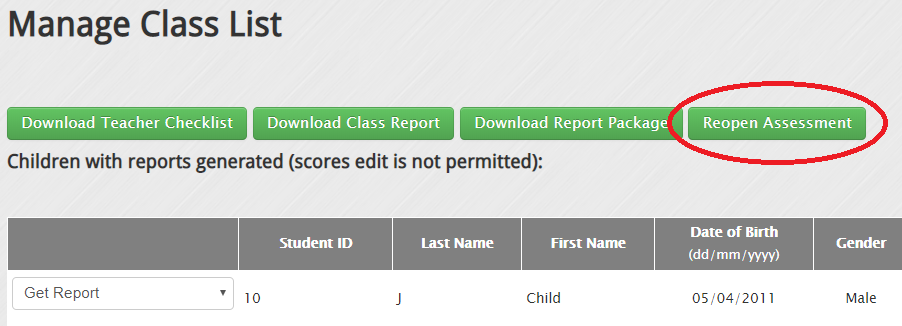
At the top of your list of children you will see a row of green buttons. Click the Reopen Assessment button and the classroom will be reopened.
The page will refresh and you'll now be presented with two lists of children; "Children to be assessed" and "Children with reports generated". If there were children who were removed from the original assessment (moved, absent, etc.), their records will appear on the first list in case you ended up needing to assess them after all. You can also add new children using the Add/Transfer a Child button. Children whose data you have already entered will be displayed in the second list with their reports still available for download.
Once you have added all of the children to the assessment list, you can click the Proceed to Score Entry button and proceed with the assessment as usual. Once the data have been entered, the class report will be updated with the new data!
Important Note
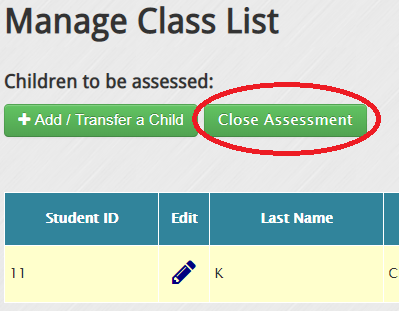
If you click the Reopen Assessment button but do not add children and forget to close it off again, your reports will not be available under the Results Viewing Section of your landing page.
To resolve this issue, simply head to the Manage Class List page and click the Close Assessment button. Your reports will then be displayed as usual on the landing page.
8. Download reports
8.1 Download report package for a classroom
You will be prompted to save the report package immediately after report generation. Alternatively, you can download the package from your landing page by clicking the following icon under Results Viewing.
How do I open or unzip zip files?
The report package you downloaded is a zip file. It bundles all of the reports into a single file and compresses it to keep the file size small. After you download the file to your computer, please follow these steps to view or print the files:
• Double-click on the zip file you have downloaded.
• To view or print the Class Report, double-click on the “classReport” folder.
• To view or print Child Reports, double-click on the “childReports” folder.
8.2 Other options to download reports
Once the reports have been generated, you can also download the Child Reports, Class Report, and Teacher Checklist from your class list page.
To download the child report in another language, click the Get Report drop-down button and select the required language.
9. Navigate between class lists
To navigate between various class lists, click on the Home link in the breadcrumb.
10. What's New section
Click on the What's New icon on the sticky navigation bar to learn about our new features and resources.
11. Resources section
Click on the Help & Resources icon on the sticky navigation bar to access the available resources. Follow the on-screen instructions to download the required resources.
12. Contact us
If at any stage you experience difficulties when completing the online data entry, please email us at eye-support@thelearningbar.com. You can also contact us by clicking on the Email Us icon on the sticky navigation bar. A list of phone numbers to contact us will appear if you click on the phone icon.
13. Log Out
Click on the Log Out icon on the navigation bar to sign out of the system.
14. How to change the language of the EYE website
Login to your EYE account
From the header section of the website, select the drop-down menu in the top right corner section in the header and select the language of your choice either in (English, French, or Español). The language will automatically be updated in the system.
Disclaimer
All of the children's names and results shown on this user guide are fictitious. No real children or user data are disclosed in this article.